| Photos of our current progress... | updated 10/12/2010 |
Click to see solar system's current status and temperature data
The Concept
Moving heated water to make people more comfortable has been used as far back as the Romans. What makes me more comfortable is not burning oil. Instead of complaining about oil and gas prices and disasters, we decided that when we built the new barn at our recently purchased property, we would give it our best attempt to utilize the sun to keep us warm and in hot water. The concepts used to design and build the barn and its active system and thermal mass storage system are proven concepts. I spent many hours going thru the documentation that others have provided (thank you) detailing how they constructed their systems and how they are functioning and most importantly, their mistakes and "what I would do different next time" list. I took bits and pieces of that information and blended it with some of our own ideas to get to where we are today. I chose the mass storage concept over a common alternative, water storage, mainly due to the entirely maintenance free aspects of it. I worry about water leaks, corrosion, etc.. Water is much better at storing heat than sand is, in the order of 5 times better. But, we were building the barn anyway, and just decided that now is the time to do mass storage because it is actually embedded into the foundation and we can't go back and do it later. We can always add water storage should we need greater heat storage in the future. There are actually 2 storage containers in the barn. There is a 120 gallon storage tank for the water/glycol mix used in the radiant floor and other areas, and the thermal mass within the foundation. The water storage allows for a more rapid transfer of heat, whereas the mass storage is quite slow to transfer its heat compared to water. In theory, the stored hot water will give us what we need for the barn's heating load and the thermal mass will give us backup heat in times of low sunlight. This is New England, you just never know what the weather will bring. Annie and I have one major wish and that is to stay warm and cozy at minimal cost as we grow old together.
I hope to be able to provide continuing information not only on our implementation of this concept but also on its performance as time goes on. As of 7/2/2010, all of our design ideas have been sealed in concrete forever!
The Design
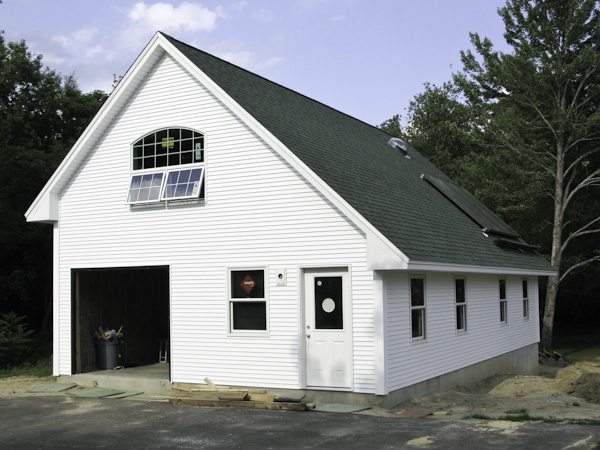
The basic concept is to use a saltbox design, but instead of the usual long roof facing north and the short roof facing south, we've reversed that to give us the maximum amount of roof for the flat panel collectors and PV's to provide the electricity to run the system in the future. The building is basically my workshop with woodworking equipment and my electronics shop. It is also protected with its live-in security guard... my cat who also provided us with solar thermal guidance. Who knows more about warm floors and solar gain than a cat?. The barn is 24x40, 960 sq. ft with 880 sq.ft of south facing roof pitched at approximately 42°. The barn has 6" walls with R19 insulation and R38 attic insulation. We have 4 large, south facing windows to provide some solar gain; a requirement of the cat's. She was quite adamant.
The system is starting out simple, just heating the barn. We will go from there as we get through our first winter and learn about the system's capabilities and characteristics. The entire design has the ability to go out to 8 flat panel collectors, I am anticipation 5-6 within a few years. We are starting out with (3) 4x8 collectors and a 120 gallon storage tank with electric backup that we had from a salvaged system (free). The pumping and solar control system uses current technology utilizing a variable speed circulation system provided in a simple, self contained package. Less components = less problems.
A PC based control system will provide (hopefully) intelligent use of the collected hot water by deciding when the barn or house needs hot water and will direct it to that location. When there is excess heat being collected, it will automatically be routed to the mass storage area. At night and during less solar productive days, we go to the mass storage system to collect as much stored heat as we can from that. If all else fails, there is an electric backup heater in our solar storage tank to be sure the cat stays warm and cozy and I can still play with my toys. As part of the control system, there will be a complete data acquisition system allowing us to monitor its daily performance. Each individual loop will have temperature monitoring allowing the control system to know how best to distribute the heat. This really comes down to two parallel systems running within the same system. . So, while we're trying to save a little bit of the heat collected, we also need to satisfy the needs of the occupants (ok, back to the cat again). A simple situation may be that the sun is blazing and we're not home. Into the bank goes the heat. When we come home later is when we need that extra bit of heat collected earlier. In winter, we only have a short amount of precious sunlight available, so we just have to be more intelligent about how we use it. It's always proven a good way to live for me, always bank a bit away and when the sun isn't shining so to speak and even in times of abundance, don't waste what you have, conserve a bit for those rainy days.
The barn utilizes a passive solar design, but more importantly, it has a potentially large collection area for mounting flat panel collectors. Within the barn is an active distribution system for the hot water we are creating. Within the foundation of the barn is an 18" deep, 1420 cubic foot box built from 2" thick XPS insulation and filled with compacted sand. This is the thermal mass storage system. Buried in the middle of that 75 ton block of sand is 900 feet of PEX tubing in 3 circuits. Hot water running through that tubing is used to charge (store heat) and discharge (recover heat) from the thermal mass.. This compacted sand bed will act as a storage battery for heat. Above that is a 4" slab of fiber filled concrete with its own 900 ft of PEX to form the barn's 3 zone radiant floor heating system. The outer wall XPS insulation was beveled at 45° to both give us a more aesthetic look at the floor to wall seam as well as provide the thermal break we need. If 1 inch of floor touched the foundation wall, we would have an equivalent of over 10 sq. ft. of contact, acting as a heat sink, drawing our heat from the slab. The cat won't like that. An alternative is to use a strip of pressure treated lumber, but we liked the beveled edge idea. The cat had no comment.
The Foundation and Mass Storage Cross Section
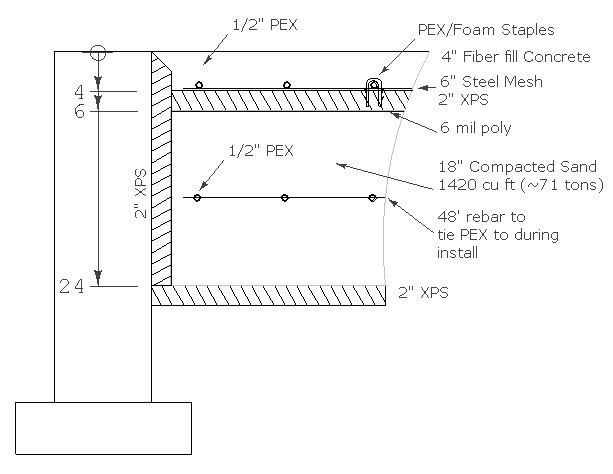
PEX to foam staples. I just can't say enough about them. They are inexpensive and are used to tie the PEX down to the foam. When we originally discussed the plan with Aaron (the floor guy) they had just done a floor similar to ours and had issues with the tubing floating. So, a little more research and found the staples. What a huge time saver they would have been. I say would have because we actually tied the tubing down to the 6" mesh with tie-wraps first. The staples were a late find and a later delivery. Typically you buy the nice $250 tool that installs them but for the one time I will do this, that wasn't worth it. So, a little trial and error and found a notched segment of PVC would make a wonderful installation tool at the cost of about $1. We did find that the wire mesh made the the tube layout really easy. The schematic was done with a grid pattern also, so it was basically a "count the squares" issue to lay out the tubing runs. Not sure if it was the 90° heat and blazing sun, but the first and most complicated run was a bit of a challenge. Especially when we came up about 5 ft short at the return and had to clip more tie-wraps, shift the 300 ft of PEX and re-attached even more tie-wraps. I assume all responsibility. Of course, when you get all done, you finally have all the bugs worked out. Next time... I'd probably skip the whole wire grid step, replacing that with staples, and, well, at the moment I have no desire to see another tie-wrap for quite some time.
The Contents of the foundation:
1800 ft of 1/2" Oxygen Barrier PEX (holds 18.3 gallons water/glycol mix)
60 sheets of 2" XPS rigid insulation
~71 tons of sand
30 sheets 6x6" steel wire mesh
1000 sq ft 6 mil polyethylene
750 tie-wraps (a conservative estimate)
200 foam staples
11 cubic yard, fiber filled cement floor
1 sore back, 2 sore knees, 2 sun roasted Italians
Many, many hours of tie-wrapping while reminiscing with an old friend. Invaluable.The System Schematic
In designing the system, I took the approach of "what if I had an unlimited supply of free hot water". What would I do with it?
Click here for the answer to that question.
Cooling using the slab (7/8/2010)
The day the framing started, a July heat wave also started. The slab temp on 7/7 was 120 degrees. Those standing on it thought I might be a bit affected by the heat when I left them to their misery and headed home, then had a thought and stopped at the hardware store for some water fittings and returned to the barn. I began fitting the garden hose to the slab's radiant tubing manifold. The skeptic(s) commented on my mission as probably being a waste of time. I don't usually give up that easy and continued to watch the temp gauges. When we returned the next morning, the slab temperature had dropped by 40 degrees to a tolerable 80 degrees. The wall remained 10+ degrees warmer than the slab, proving we really did reduce the slab's temp with well water and that we do have a good thermal break between the frost walls and the floor. The skeptic (ok, it's Della) retracted his comments from the previous day about my attempts to make his life more comfortable (actually, he was more concerned about the concrete curing). Hey, I don't blame him, he was standing on a hot plate while I was running around with 60 degree water splashing all over me telling him how cool the slab will be in a little while. Yeah, right. Anyway, now that the majority of the heat wave is out of our slab, the next step is to use the mass storage under the slab to provide the cooling by simply pumping the hot water in the slab through that massive sand block, cooling the water as it is returned back to the slab. And, if you think about it, as we're cooling the slab to make the guys comfortable, we're also banking away that heat into the mass storage area, preheating it a bit. That is all to be proven of course, but it sounds good, doesn't it? There are limitations, the floor will begin to condense if too cold, so this isn't an air conditioner, simply a method of making the place a bit cooler.
This gives way to thoughts of running the garden hose through a heat exchanger in spring and summer so as we water the garden, we can also provide some stored cooling. The garden doesn't need ice cold water, cool the mass storage with the well water as it heads off to wherever it's needed, then come July/August, start the whole cycle over again, exhanging that summer heat for some coolness in the mass storage area.
A quick update on cooling (8/20/2010)
Nevermind. Looks like cooling will not be a requirement! The insulation is in and it was 90 degrees yesterday and the air was still. I didn't put a thermometer in there, but the entire building, even with the lack of doors on the front, was very comfortable. Even upstairs. We have added a gable fan into the peak of the rear wall of the building for heat removal and to assist with air quality in the shop. And, no, it wasn't running and it was still quite comfortable. So, even though the cooling helped when the slab was exposed to the sun, looks like the building will keep itself cool.
The Crew and friends
With one shot to get this right and a serious desire for the best quality I could get for our money, I relied on someone who has been by my side for 53 years... Steve DellaGiustina (Della). He and his son Nick of Tolland Mountain Builders provide great quality and workmanship along with their construction design assistance, making this whole concept buildable. Tolland Mountain Builders brought us Andy Gogol and his son Adam out of Granville who did all the site work and Tom & Aaron Grabowski of Southwick provided the incredible foundation and floor work. I'm not in the construction business, but I do know quality workmanship... it's in my back yard.. Thanks to Steve, Nick, Kevin, Andy, Adam, Tom, Aaron and Todd. Everyone working on the project showed interest and curiosity in the whole project which was pretty cool. Plus, I feel you get a person's best work when they are interested in the project.
 |
 |
 |
 |
 |
The Return on Investment
What is our return on investment? We're not burning oil.
Yes, we are only making a microscopic impact on the environment but it is a positive impact, not a negative one.
The Concept Drawings
| View from South West |
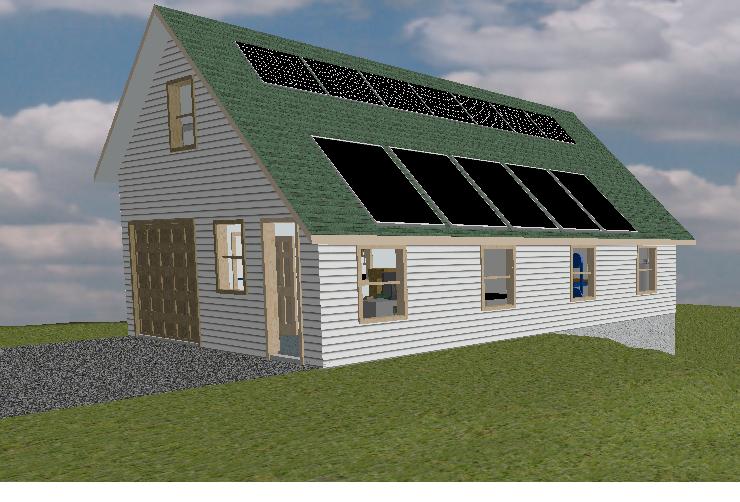 |
| View from South East |
 |
| View from South West |
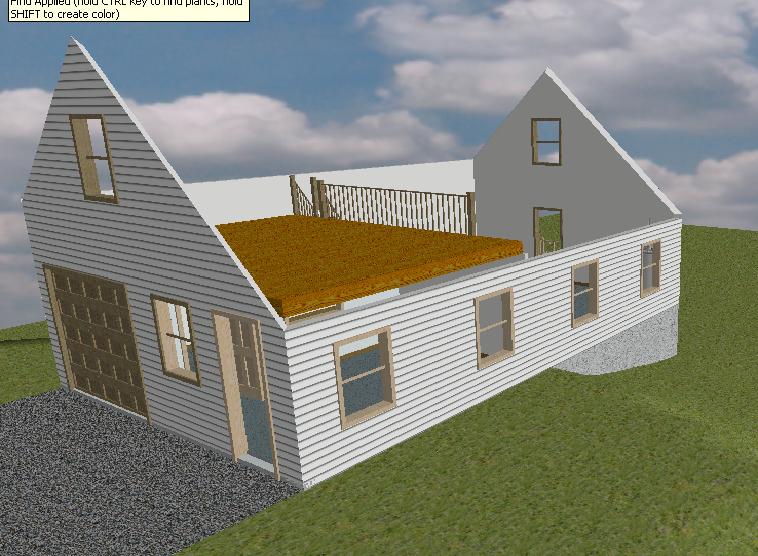 |
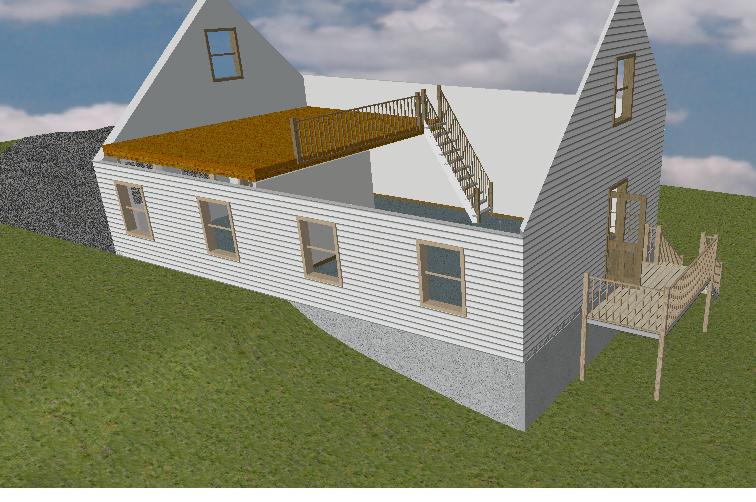
| Cutaway view from North side showing I'm out of room already. |
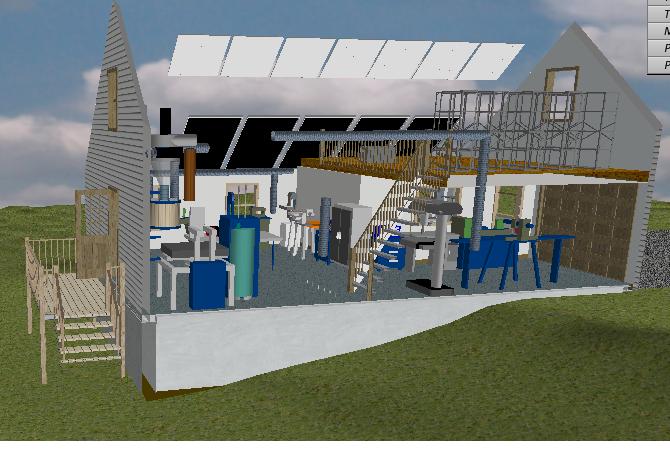 |